
Set up an allocation
Create an allocation, add tiers, products, rules and customers, and schedule when it opens.
An allocation offers a limited release, such as a spring release of 2022 Reserve Cabernet, to the customers you choose. Each tier has its own products, quantities and customers. This guide follows the allocation form from top to bottom.
For how allocations work from start to finish, see Allocations overview.
Before you start
Check access
- Allocations must be available for your store. If you don't see Allocations in the Awtomic navigation, contact Awtomic support.
- Your user needs the Allocations permission in Awtomic user permissions.
Prepare your products
- Products must be active in Shopify. Draft products don't appear in the product picker, and customers can't buy a product that later becomes draft or archived.
- Products with the Shopify product type "Bundle" can't be added to an allocation.
Make these decisions first
- Tiers and customers. Decide which groups get which wines and quantities, and how you'll find each group: by customer tag, by subscription, from a CSV file or one at a time.
- Separate orders or a single order. This choice locks when the allocation opens. See step 8.
- Schedule. Decide when each tier opens and closes, and whether all tiers share one window.
1. Create the allocation
- In Awtomic, open Allocations and select Create allocation.
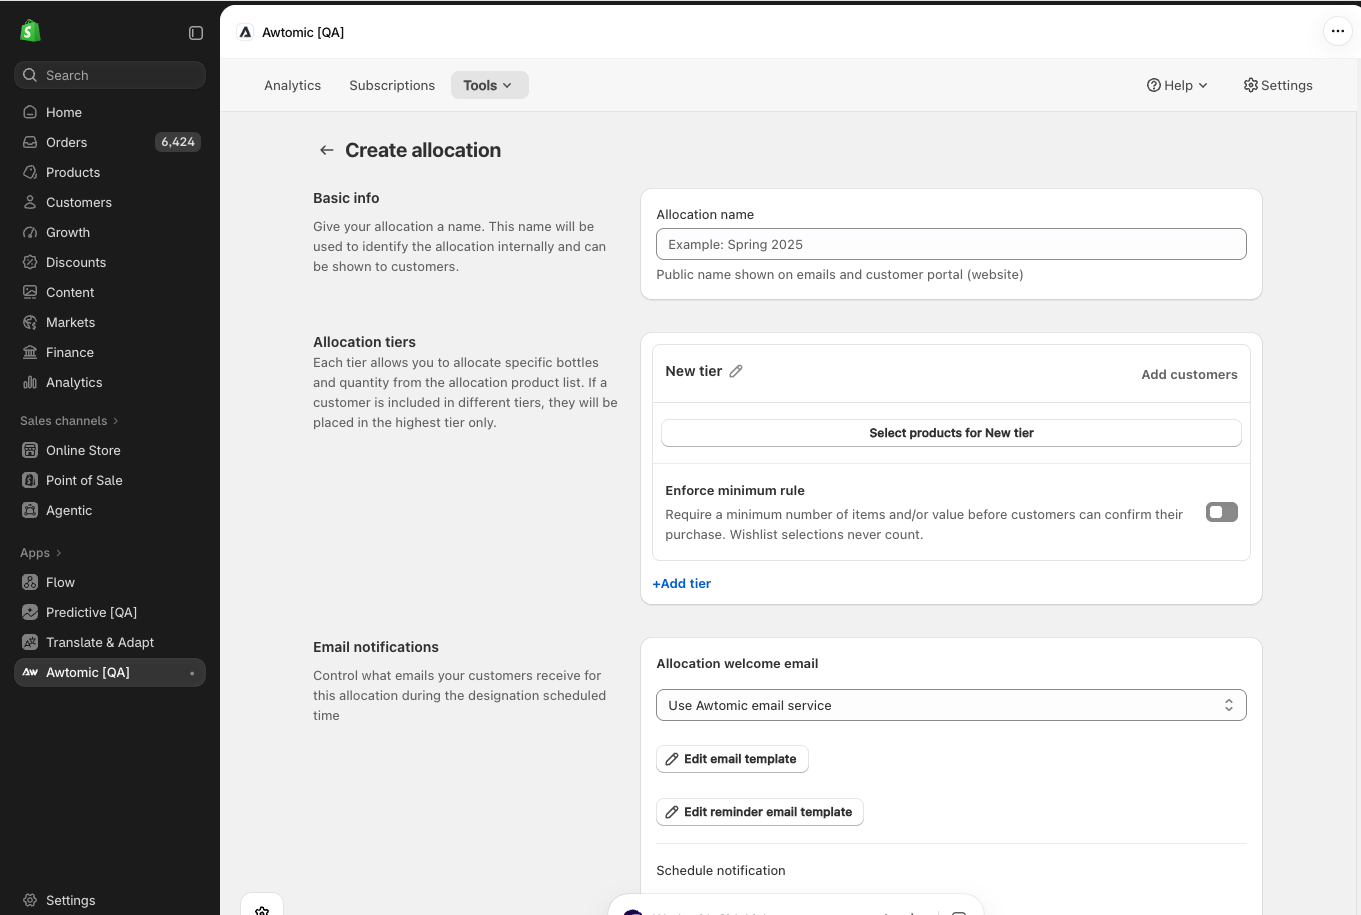
- Under Basic info, enter an Allocation name, such as "Spring 2026 Release". Use at least 3 characters. This name is public: customers see it in emails and in the customer portal.
- Add at least one tier with at least one product (steps 2 and 3). You can't save the allocation until every tier has a product.
- Select Save.
After the first save, the page becomes Edit allocation and the allocation is a Draft. Until then, the Schedule section shows "Save the allocation before setting up its schedule." and you can't add customers.
2. Add tiers
Tiers appear under Allocation tiers. The first tier is named "New tier".
- Add a tier: select +Add tier.
- Rename a tier: select the pencil icon next to the tier name, enter the new name and select Save. Each tier needs a unique name.
- Delete a tier: select the trash icon, then Delete tier to confirm. This permanently removes the tier and its product rules. If the tier has customers, they're removed as well. You can delete a tier only while the allocation has more than one tier.
Tiers can't be reordered. They stay in the order you created them.
If a customer is added to more than one tier, they're placed only in the "highest" tier, as the help text in this section says.
3. Choose products and selection rules for each tier
- In the tier, select Select products for followed by the tier name. Once a tier has products, use Add products to add more or Clear all to start over.
- Choose products in the picker. Each variant becomes its own row.
- For each row, set Min and Max.
- Open the three-dot menu (⋮) at the end of the row to set the wishlist option, Wishlist max and Default selection, or to Remove product.
- Drag rows by the handle to set the order customers see them in.
A product that becomes draft or archived in Shopify shows a Draft or Archived badge in the tier. Customers can't buy it until you make it active in Shopify or remove it from the tier.
Min and Max
- Min is the lowest quantity the customer can choose for this product. Use 0 to make the product optional.
- Max is the most the customer can buy of this product. Max must be at least 1 and at least as high as Min, except for Wishlist only product rows, where Min and Max stay at 0.
New rows start at Min 0 and Max 1, with wishlist requests allowed and Default selection set to Max.
Wishlist options
A wishlist quantity is a request, not a purchase. Customers see "Wishlist items are not guaranteed and will be processed separately." You decide later which requests to grant.
| Option | What customers can do |
|---|---|
| Customers can wishlist item | Buy up to Max. Anything they add above Max becomes a wishlist request. |
| Wishlist only product | Request the product but not buy it directly. Min and Max are set to 0 and locked. |
| Block item from wishlist | Buy up to Max. They can't request more. |
Wishlist max caps how many a customer can request. If you don't set it, wishlist requests aren't capped. You can't set it when the product is blocked from the wishlist.
Default selection
Default selection sets the quantity already filled in when a customer first opens the allocation. They can change it within Min and Max.
- Min fills in the Min quantity.
- Max fills in the Max quantity.
- Specific fills in the number you enter in Value. It must be between Min and Max.
Wishlist-only products always start at 0.
Example
| Product | Min | Max | Wishlist option | Wishlist max | Customer sees |
|---|---|---|---|---|---|
| 2022 Reserve Cabernet | 0 | 2 | Block item from wishlist | — | "Limit 2" |
| 2024 Rosé | 0 | 6 | Customers can wishlist item | 6 | "Limit 6. Wishlist: up to 6." |
| 2015 Library Syrah | 0 | 0 | Wishlist only product | 2 | "Wishlist only. Request up to 2." |
Messages you might see
- "At least one product must be selected for the tier": every tier needs a product before you can save.
- "Value must be greater than or equal to min quantity" or "Value must be less than or equal to max quantity": the Specific default selection is outside Min and Max.
4. Set a tier minimum (optional)
A tier minimum requires customers to reach a total before they can confirm their purchase.
- In the tier, turn on Enforce minimum rule.
- Choose a Minimum rule: Number of items, Dollar amount or Both.
- Enter Minimum items, Minimum amount, or both.
- Check the Display label, the text customers see, such as "Select at least 6 items (excluding wishlist)". It updates as you change the minimum until you edit it yourself.
Wishlist selections never count toward the minimum. You can't set Minimum items higher than the total Max of the tier's products, not counting wishlist-only products. If you do, you'll see "Customers can select at most … items in this tier, so the minimum can't be higher".
If you don't see this option, contact Awtomic support to confirm it's enabled for your store.
5. Add customers to each tier
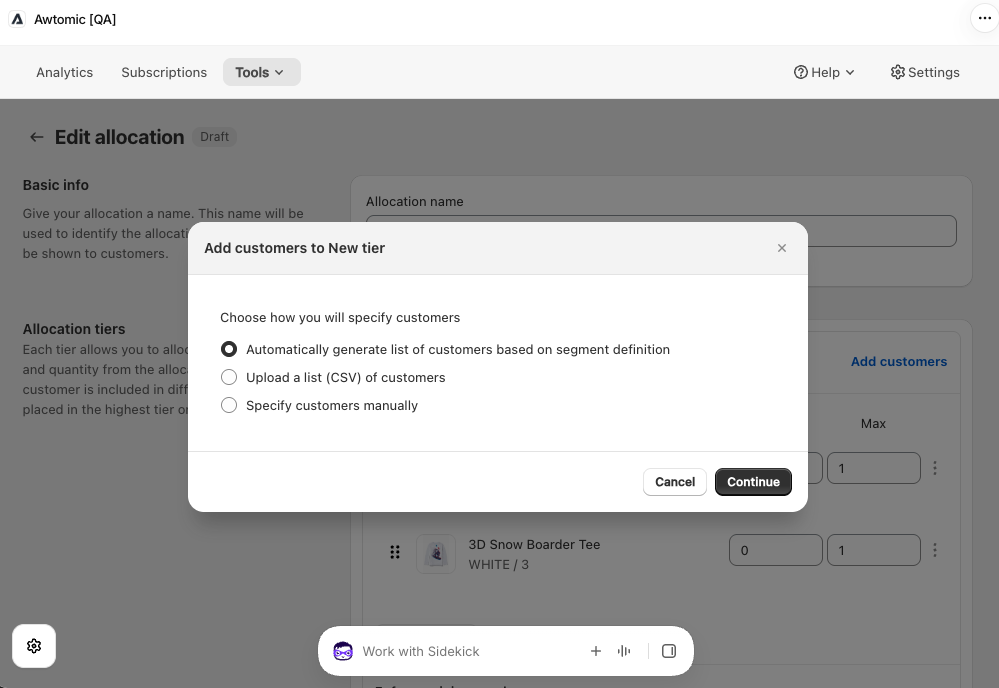
Save the allocation first. For a tier with no customers yet, select Add customers in the tier header. Once a tier has customers, the header shows the customer count instead: select it, then select +Add customers. Choose a method and select Continue.
Automatically generate list of customers based on segment definition
Build a rule, then continue:
- Customer tag: choose Includes ANY of the selected tag(s), Includes ALL of the selected tag(s), Includes ONLY the selected tag(s) or Does not include ANY of the selected tag(s). Type a tag in Customer tag and select Add.
- Subscription: choose Contains ANY, Contains ALL, Contains ONLY or Does not contain ANY, then Specific product(s) or Specific variant(s), and select Select products.
To combine rules, select Add another customer rule, then choose whether the customer must match All rules or Any rules.
Upload a list (CSV) of customers
- Select Download CSV to get the template. Its columns are First Name, Last Name and Email.
- Add one row per customer.
- Upload the file under Select file.
Automatically create customers in Shopify if provided email doesn't exist is checked by default. Clear it if you only want customers who already exist in Shopify. Rows whose email doesn't match a Shopify customer are then skipped. The import doesn't list which rows were skipped, so compare the tier's customer count with your file.
Specify customers manually
Search for existing customers and select them. You can add up to 150 customers at a time this way. For more, use a CSV or a segment.
After you add customers
Segment and CSV results are captured when you add them. They don't update later if a customer's tags or subscriptions change. To include new matches, add customers again.
While customers are being added, the tier shows "Adding customers…" with progress. If adding stops early, you'll see "Adding customers stopped before it finished". The customers already added are kept. Select Retry to add only the missing ones. The banner also lists skipped customers, for example "No email address".
To see or remove a tier's customers, select the customer count in the tier header.
Once the allocation is open, Specify customers manually is the only way to add customers. You can also remove customers or move them to another tier.
6. Choose how customers are notified
Under Email notifications, choose the Allocation welcome email:
- Use Awtomic email service: Awtomic emails customers. Select Edit email template to change the email. See Email customization.
- Use Klaviyo: Awtomic sends an "Allocation Open" event to Klaviyo, and your Klaviyo flow sends the message. Select Send test event to check it. If Klaviyo isn't connected, select Connect Klaviyo. See Klaviyo integration.
To change the reminder email, select Edit reminder email template. With Klaviyo, reminders trigger an "Allocation Reminder" event.
Klaviyo metric namesIn Klaviyo, the metrics are named Allocation Open and Allocation Reminder. The banner in the Awtomic form shows them in lowercase; use the capitalized names when you set up your Klaviyo flows.
Under Schedule notification, choose when the open notification goes out:
- When allocation opens (default).
- Delay notifications by a specific number of days: enter days after the tier opens, from 1 to 365, in whole or half days. The delay must end before every tier closes.
- Don't schedule notification: nothing is sent automatically. You send it yourself after the allocation opens.
7. Set the delivery method and shipping dates
Under Delivery method, choose the Default delivery method. This is the option customers start with.
- Shipping uses the customer's default shipping address.
- Pickup starts customers with a pickup option.
To let customers choose a shipping date, turn on Enable shipping date selection under Shipping dates.
- On the General tab, choose a Date mode:
- Specific dates: select Add date for each date. Label (optional) is filled in from the date unless you type your own.
- Date range: set Range start and Range end.
- Choose a Default shipping date. It's required.
- Optionally turn on Black out blocks and select + Add a blackout block. Give each block a Name and a Date range. Customers can't choose the start date, the end date or any day between them.
- To treat tiers differently, open Per tier and choose Inherit from allocation, Disabled for this tier or Custom for this tier.
If you see "The default shipping date is inside a blackout block. The customer will select a date instead.", customers won't get a date filled in. Move the default date if you want one.
8. Choose how orders are processed
Under Order processing, choose Allocation orders:
| Create separate allocation and wishlist orders (default) | Create a single order after the allocation period | |
|---|---|---|
| When a customer confirms | An order is created right away for their allocation selections. | Their selections are recorded. No order is created yet. |
| Granted wishlist items | Created as a separate order when you release the wishlist. | Included in the customer's single order. |
| After the allocation closes | Use Release wishlist to grant wishlist requests. | Use Release allocation to create each customer's order. |
Let customers return while the allocation is open lets customers come back while the allocation is open. With separate orders, they buy the rest of their allocation in additional orders. With a single order, they can revise their selection until the allocation closes.
Everything in this section locks once the allocation opens.
9. Schedule the allocation
- Under Schedule, choose Same schedule for all tiers or Set schedule per tier.
- Set the Start date, Start time, End date and End time. Times are on the hour. The start can't be in the past, and the end must be after the start.
- Select Confirm and Schedule. Any unsaved changes elsewhere in the form are saved first. If the form has errors, the allocation isn't scheduled until you fix them.
Times are based on the time zone of the computer you're using to set the schedule.
The allocation's status changes to Scheduled. To change the schedule before it opens, select Edit, make your changes and select Confirm and Schedule again. Select Never mind to discard your changes.
The allocation opens and closes automatically at the scheduled times. With per-tier schedules, the allocation shows Open as soon as the first tier opens, and the settings that lock at open lock for every tier. It shows Closed after the last tier ends.
Open or close manually
On the allocation's page, you can also:
- Select Open allocation on a Scheduled allocation. "All tiers will open immediately, ahead of their scheduled start. Customers in every tier will be notified that the allocation is open, just as they would be on the scheduled date."
- Select Close allocation on an Open allocation. "All tiers will close immediately, ahead of their scheduled end. Customers will no longer be able to make selections. This cannot be undone."
You can't open or close manually while customers are still being added to a tier. If you don't see these buttons, contact Awtomic support to confirm they're enabled for your store.
10. Check your allocation before it opens
There's no preview before the allocation opens. Before the start time, check:
- The allocation name reads well to customers.
- Every tier has the right products, Min, Max, wishlist options and default selections.
- No product shows a Draft or Archived badge.
- Each tier has customers and no "Adding customers stopped" banner.
- The notification choice and email template or Klaviyo flow are ready.
- Delivery method, shipping dates and order processing are right. They lock at open.
- The schedule dates and times are what you intended.
Once the allocation is open, you can check a customer's view. On the Customers tab, open the customer's menu and select Allocation portal, then Open portal link or Copy portal link.
11. What you can change after the allocation opens
While the allocation is open, the edit page shows:
"Customer changes (add, move, remove) save immediately. Product and rule changes apply on Save and update the customer view on their next portal visit; already-paid orders are not affected. Allocation name, tier names, schedule, notification settings, and delivery method stay locked while the allocation is open."
| Setting | Draft or Scheduled | Open | Closed |
|---|---|---|---|
| Allocation name | Yes | No | No |
| Add, rename or delete tiers | Yes | No | No |
| Products, Min, Max, wishlist, default selection, tier minimum | Yes | Yes | No |
| Customers | Add (any method), remove | Add manually, remove, move | No |
| Email notifications | Yes | No | No |
| Delivery method and shipping dates | Yes | No | No |
| Order processing | Yes | No | No |
| Schedule | Yes | No | No |
Once the allocation is closed, you can't edit it.
12. Duplicate an allocation
To reuse a setup, open the allocation and select Duplicate.
- Enter the New allocation name. It starts as "Copy of" followed by the original name.
- Under Attributes to copy, Allocation tiers and Products are always copied. Customers, Email notification setting and Delivery method setting are selected by default. Clear any you don't want.
- Select Duplicate.
Other settings, such as shipping dates and order processing, are copied too. Per-tier shipping-date settings are copied only when you duplicate a Draft or Scheduled allocation. When you duplicate an Open or Closed one, every tier starts as Inherit from allocation, so recheck Per tier under Shipping dates. The schedule isn't copied, so the copy starts as a Draft and opens for editing. Review every section and schedule it when you're ready.
Updated 19 days ago